
When your garage door opener quit working, it creates an immediate inconvenience that disrupts your daily routine. Whether you're rushing to work in the morning or returning home after a long day, a malfunctioning opener transforms a simple task into a frustrating challenge. Understanding why this happens and knowing how to respond can save you time, money, and stress. Most opener failures stem from a handful of common issues that homeowners throughout Kitsap County encounter regularly, and many can be resolved without professional intervention.
Common Reasons Your Garage Door Opener Stopped Functioning
The first step in addressing a non-responsive opener is identifying the root cause. Several factors can prevent your system from operating normally, ranging from simple power issues to more complex mechanical failures.
Power Supply Problems
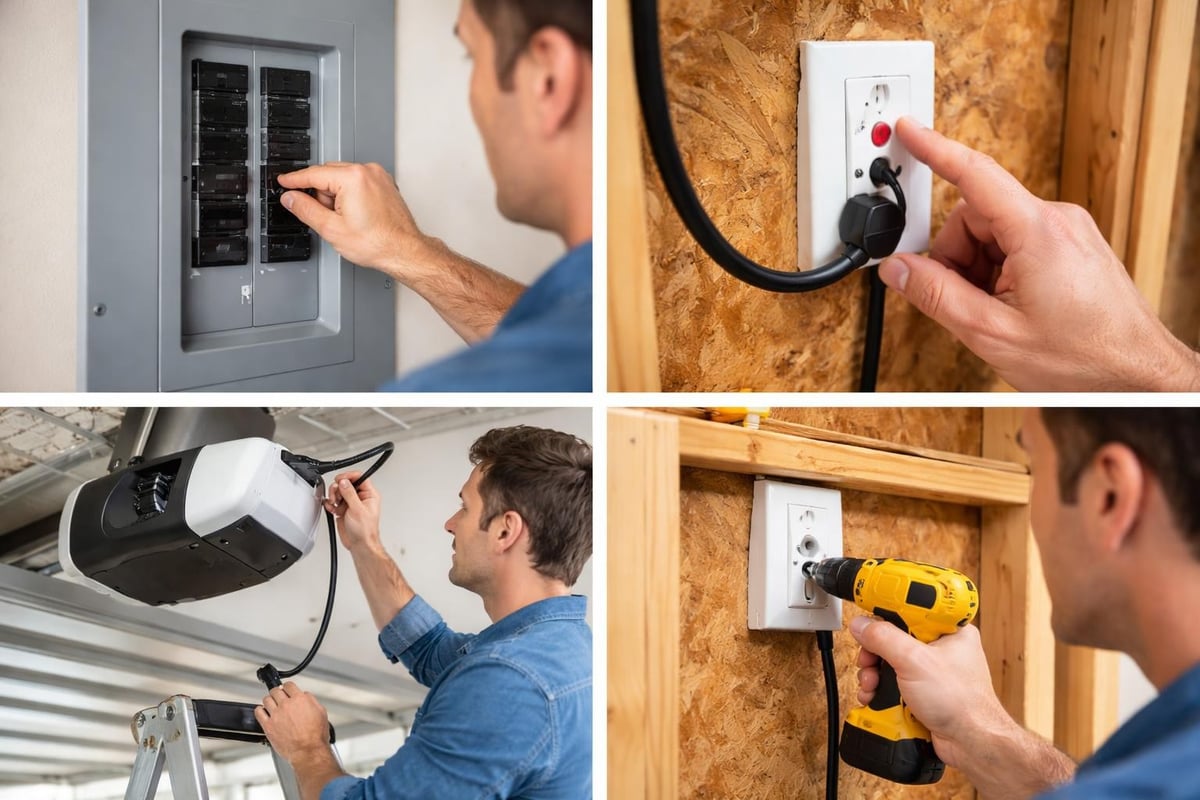
Power-related issues account for a significant portion of opener failures. Before assuming your motor unit has failed, check these basic power sources:
- Circuit breaker status – Verify the breaker hasn't tripped in your electrical panel
- GFCI outlet condition – Reset any tripped ground fault circuit interrupters near the opener
- Power cord connection – Ensure the cord is securely plugged into the outlet
- Outlet functionality – Test the outlet with another device to confirm it's providing power
Sometimes the solution is as simple as plugging the unit back in after it became disconnected during cleaning or when items were stored on overhead shelves. If you've recently experienced a power surge or severe weather, your opener's internal circuit board might have sustained damage requiring professional attention.
Remote Control and Wall Button Issues
When your garage door opener quit working with the remote but responds to the wall button, the problem lies with your transmitter rather than the motor unit. Battery replacement solves most remote control failures, but other factors can interfere with signal transmission.
Radio frequency interference from nearby devices, vehicles, or even LED light bulbs can disrupt communication between your remote and receiver. Try using the remote from different distances and angles to determine if the issue is consistent or intermittent.
| Symptom | Likely Cause | Solution |
|---|---|---|
| Remote doesn't work, wall button does | Dead batteries or signal issue | Replace batteries, reprogram remote |
| Wall button doesn't work, remote does | Wiring or button failure | Check connections, replace button |
| Neither remote nor button works | Power or logic board issue | Check power, inspect control board |
| Intermittent response from both | Sensor alignment or obstruction | Clean and realign safety sensors |
Wall button failures typically indicate loose wiring connections or a worn button that needs replacement. Inspect the wires running from the wall button to the motor unit for any visible damage or disconnection.
Safety Sensor Misalignment
Modern garage door openers include photoelectric safety sensors positioned on either side of the door near the floor. When these sensors are misaligned, dirty, or obstructed, the opener refuses to close the door as a safety precaution.
Look for indicator lights on each sensor unit. Most systems display a solid light when sensors are properly aligned and a blinking light when alignment is off. Dust, spider webs, condensation, or even bright sunlight can interfere with the sensor beam.
Clean both sensor lenses with a soft cloth and ensure nothing blocks the path between them. Gently adjust the sensor brackets until both indicator lights remain steady. According to guidance on maintaining garage door openers, monthly sensor checks prevent many common operational failures.
Mechanical Components That Cause Opener Failure
Beyond electrical issues, mechanical problems can prevent your opener from functioning correctly. These require more hands-on diagnosis but remain accessible to many homeowners.
Broken or Worn Drive Components
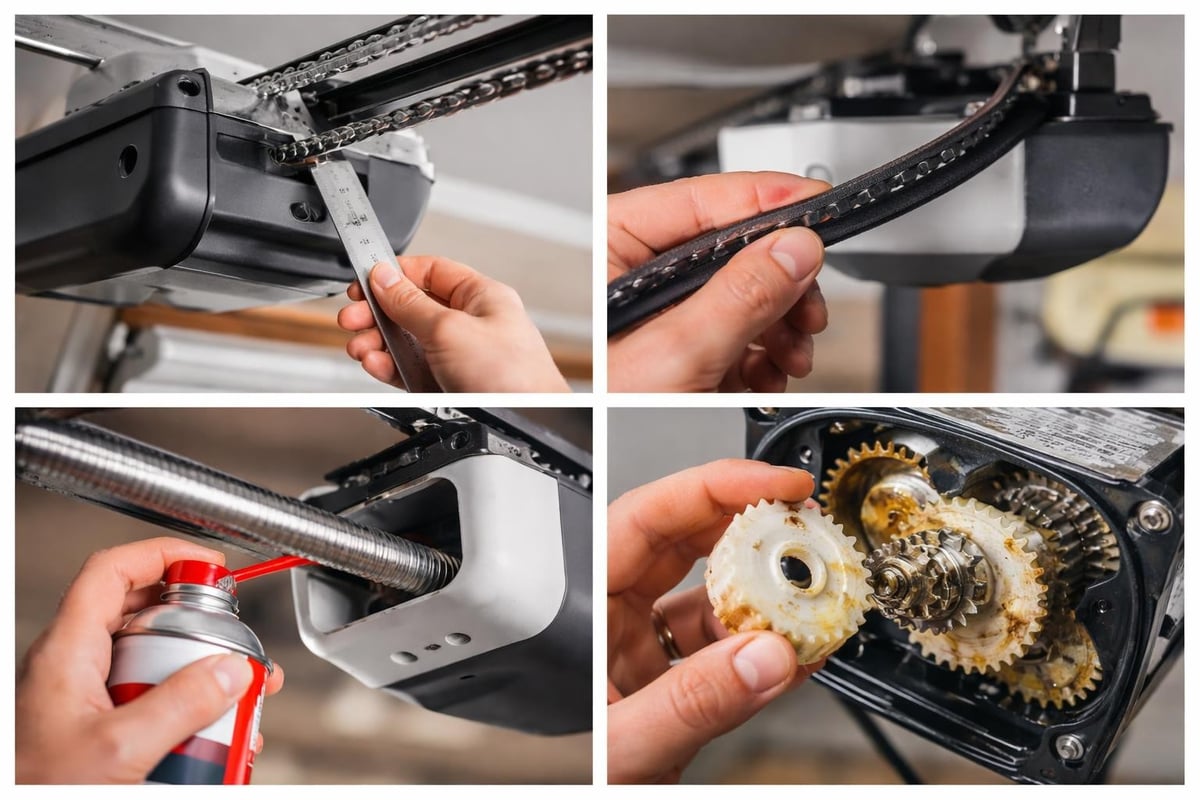
The drive system transfers power from the motor to the door itself. Chain-drive, belt-drive, and screw-drive systems each have specific wear points that can fail over time.
Chain-drive openers develop slack as the chain stretches with use. Excessive slack prevents the trolley from engaging properly with the door arm. Check your owner's manual for proper chain tension specifications, typically allowing about half-inch sag in the middle when the door is closed.
Belt-drive systems experience similar issues as belts age and stretch. A worn belt may slip on the drive gear, creating noise without moving the door. Inspect the belt for fraying, cracking, or glazing on the contact surface.
Screw-drive openers rely on a threaded rod that can accumulate debris or lose lubrication. When your garage door opener quit working and you hear the motor running without door movement, examine the drive mechanism for obstructions or excessive wear.
Stripped Gears Inside the Motor Unit
One of the most common mechanical failures occurs when the main drive gear inside the motor housing strips its teeth. This typically happens gradually, with the door operating more slowly before stopping completely.
You'll often hear the motor running while the door remains stationary when gears have failed. Opening the motor cover reveals white plastic gear fragments scattered inside the housing. Gear replacement requires disassembling the motor unit, a task many homeowners can accomplish with basic tools and patience.
Disconnected Trolley or Emergency Release
The emergency release cord allows manual door operation during power outages. If this mechanism becomes stuck in the disengaged position, the opener motor runs without moving the door.
Reconnect the trolley by pulling the emergency release handle toward the motor while manually lifting the door until the trolley snaps back into the engaged position. Some systems require operating the opener while holding the trolley assembly to ensure proper re-engagement.
Diagnosing Specific Opener Behaviors
Different symptoms point to specific problems within your garage door system. Understanding these patterns accelerates the troubleshooting process.
Motor Runs But Door Doesn't Move
This scenario indicates a disconnect between the motor and the door itself. Potential causes include:
- Disengaged trolley – Check the emergency release mechanism
- Stripped drive gear – Listen for motor operation without mechanical engagement
- Broken drive belt or chain – Visually inspect the entire drive component
- Frozen or bound door – Test manual operation with the opener disconnected
When troubleshooting garage door issues, always disconnect the opener and test manual operation to isolate whether the problem lies with the opener mechanism or the door itself.
Door Reverses Immediately After Closing
Automatic reversal serves as a critical safety feature, but unnecessary reversals indicate adjustment problems. The down-force limit switch tells the opener how much resistance is normal when the door reaches the closed position.
If sensitivity settings are too high, the opener interprets normal closing resistance as an obstruction. Adjust the down-force setting incrementally, testing after each adjustment until the door closes completely without reversing. Most openers feature adjustment screws on the motor housing labeled for up and down force limits.
Opener Hums But Won't Start
A humming sound without movement typically means the motor attempts to run but encounters too much resistance. This often occurs in cold weather when lubricant thickens or when the door binding prevents normal operation.
Check whether you can manually lift the door with the opener disconnected. If the door feels unusually heavy or binds during movement, the issue lies with the door hardware rather than the opener. Garage door spring repair professionals can address balance issues that overload your opener motor.
Preventive Maintenance to Avoid Future Failures
Regular maintenance prevents most scenarios where your garage door opener quit working unexpectedly. Implementing a consistent schedule protects your investment and ensures reliable operation.
Monthly Inspection Tasks
Dedicate fifteen minutes each month to these essential checks:
- Visual observation – Watch the door complete a full cycle, noting any unusual sounds or movements
- Safety sensor test – Place an object in the door path and verify automatic reversal
- Remote battery check – Replace batteries annually or when response weakens
- Manual operation test – Disconnect the opener and verify smooth manual movement
These simple tasks identify developing problems before they cause complete failure. As outlined in this comprehensive maintenance checklist, consistent attention to these details extends opener lifespan significantly.
Quarterly Lubrication Schedule
Proper lubrication reduces friction and wear on moving components. Apply lithium-based grease or specialized garage door lubricant to these points every three months:
- Chain or screw drive mechanisms
- Trolley wheels and bearings
- Door hinges and roller bearings
- Spring coils (torsion springs only)
Avoid over-lubricating, which attracts dust and debris that accelerate wear. A light coating on metal-to-metal contact points provides adequate protection. Never use WD-40 or similar penetrating oils, as these attract contaminants and don't provide lasting lubrication.
Annual Professional Service
While many maintenance tasks suit DIY completion, annual professional inspection catches issues requiring specialized knowledge. Trained technicians assess:
- Spring tension and balance accuracy
- Cable condition and attachment security
- Track alignment and roller condition
- Motor mounting and vibration dampening
- Safety feature calibration and testing
For homeowners throughout Kitsap County, scheduling professional maintenance during mild weather months ensures your system performs reliably when you need it most. Professional service becomes particularly important for openers approaching or exceeding ten years of operation.
When to Replace Rather Than Repair
Sometimes the most cost-effective solution when your garage door opener quit working involves replacement rather than repair. Several factors influence this decision.
Age and Parts Availability
Openers manufactured before 2015 lack modern safety features and energy efficiency improvements. If your unit predates this period, replacement provides better long-term value than investing in repairs for obsolete technology.
Parts availability becomes challenging for openers more than fifteen years old. Even if repair seems possible, obtaining replacement components may involve extended waits or premium pricing for discontinued parts.
Cost Comparison Analysis
Compare repair costs against replacement investment using this framework:
| Repair Cost | Opener Age | Recommended Action |
|---|---|---|
| Under $100 | Any age | Repair is cost-effective |
| $100-$200 | Under 10 years | Repair justified |
| $100-$200 | Over 10 years | Consider replacement |
| Over $200 | Under 7 years | Repair acceptable |
| Over $200 | Over 7 years | Replacement recommended |
This analysis assumes average opener replacement costs of $300-$500 installed. Your specific situation may justify different thresholds based on opener features, door size, and installation complexity.
Technology and Safety Upgrades
Modern openers offer substantial improvements over older models. Battery backup systems maintain operation during power outages, an increasingly valuable feature as severe weather events become more common in the Pacific Northwest.
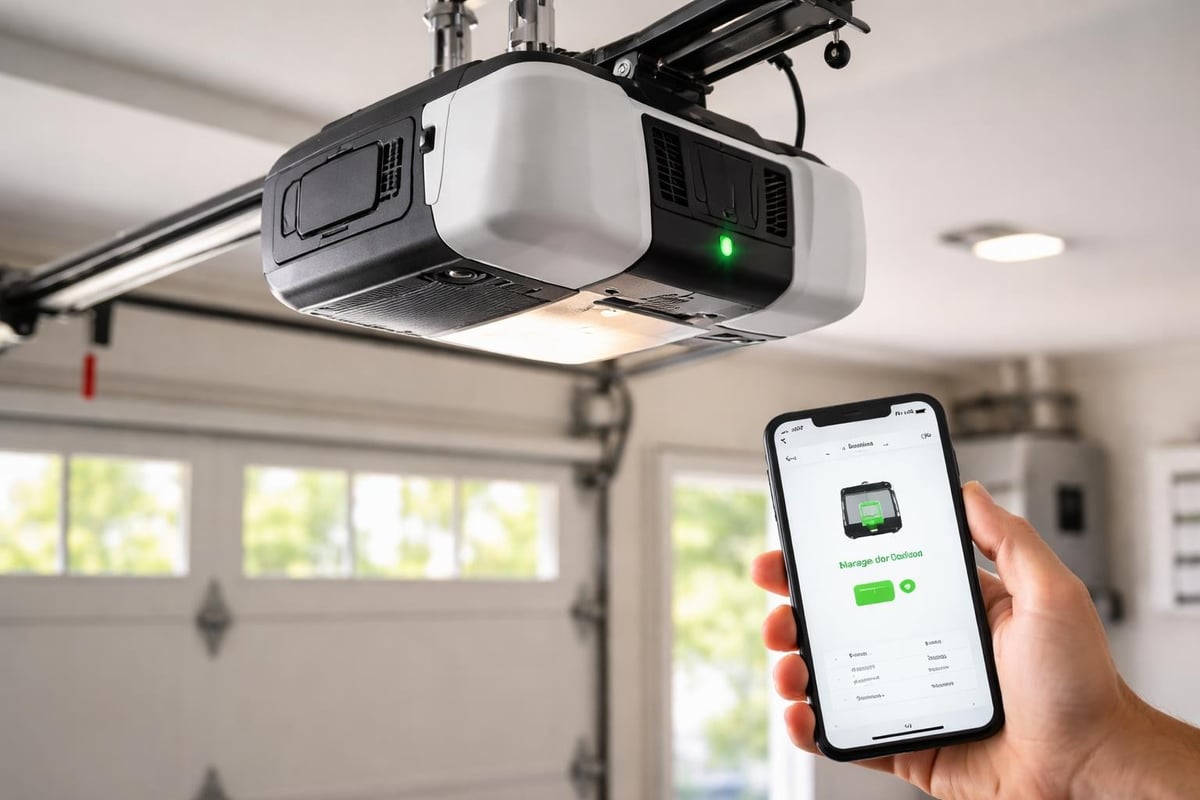
Wi-Fi connectivity enables smartphone control and monitoring from anywhere, providing security and convenience impossible with previous generations. Enhanced security features including rolling code technology prevent code grabbing and unauthorized access attempts.
For properties requiring reliable operation and maximum security, upgrading to current technology makes sense even when repair remains technically feasible. Professional garage door opener installation ensures new systems integrate properly with existing doors and meet all current safety standards.
Troubleshooting Advanced Electrical Issues
Some electrical problems require multimeter testing and basic understanding of circuits. Approach these diagnostics carefully, disconnecting power before examining internal components.
Control Board Failure Symptoms
The logic board serves as the opener's brain, processing signals from remotes, wall buttons, and sensors. Board failure produces distinctive symptoms:
- Erratic behavior with features working intermittently
- Complete non-response despite confirmed power supply
- Lights functioning but motor refusing to operate
- Inability to program remotes or adjust settings
Lightning strikes and power surges commonly damage control boards. Whole-house surge protection reduces this risk, providing affordable insurance against expensive opener damage.
Capacitor Testing and Replacement
Start capacitors give motors the initial boost needed to begin rotation. When capacitors fail, motors hum without starting or struggle to initiate movement.
Capacitors store electrical charge even after power disconnection, requiring careful discharge before handling. If you're uncomfortable working with electrical components, this repair warrants professional service. Replacing a failed capacitor costs considerably less than replacing an entire motor assembly.
Wiring Connection Inspection
Loose or corroded wiring connections create intermittent failures that prove frustrating to diagnose. Examine all connection points for:
- Corrosion on terminal screws
- Loose wire nuts on spliced connections
- Damaged insulation from rodent activity
- Staples or fasteners piercing wire insulation
Kitsap County's marine climate accelerates corrosion on exposed metal connections. Applying dielectric grease to connections provides moisture protection and ensures reliable electrical contact. Understanding basic troubleshooting techniques helps homeowners determine when they can safely perform repairs versus when professional expertise becomes necessary.
Emergency Solutions and Temporary Fixes
When your garage door opener quit working at an inconvenient time, temporary solutions keep you operational until proper repairs can be completed.
Manual Operation Procedure
Every opener includes an emergency release allowing manual operation. Locate the red handle hanging from the trolley assembly and pull down firmly to disengage the opener mechanism.
With the opener disengaged, manually lift the door to the fully open position. The door should stay open through spring tension alone. If it falls when released, spring problems exist requiring immediate professional attention before continuing operation.
Never leave the emergency release disengaged with the door in the down position for extended periods, as this prevents the door's security features from functioning. When you're ready to re-engage automatic operation, most systems require closing the door manually while pulling the release handle toward the motor housing.
Securing an Inoperable Door
If repairs will extend overnight or longer, secure the door against unauthorized entry. A C-clamp applied to the track just above one bottom roller prevents the door from being lifted from outside. For maximum security, apply clamps to both tracks.
Alternatively, drill a hole through the track and roller shaft, inserting a bolt to prevent movement. This method works for extended periods when the door must remain closed and secure during repair delays.
Understanding Limit Switch Adjustments
Limit switches control how far the door travels in both directions. Improper settings cause doors that close partially, reverse randomly, or refuse to close completely.
Up-Limit Adjustment Impact
The up-limit switch determines when the door reaches the fully open position. If set incorrectly, the door stops before fully opening or attempts to travel beyond the open position, creating grinding and stress on components.
Most openers feature adjustment dials labeled for up and down limits. Turning these dials clockwise typically increases travel distance, while counterclockwise rotation decreases it. Make small adjustments, testing after each change to prevent overcorrection.
Down-Limit Calibration Process
Down-limit settings prove more critical, as improper adjustment causes the door to reverse before fully closing. The opener interprets incomplete closing as encountering an obstruction, triggering automatic reversal.
Adjust the down-limit incrementally until the door closes completely and the opener automatically cuts motor power. If the door closes but motor continues running, you've exceeded the correct setting. Back off slightly until the motor stops immediately when the door reaches the closed position.
Resources on garage door maintenance emphasize the importance of proper limit adjustments for both door longevity and opener reliability.
Impact of Door Condition on Opener Performance
Your opener's reliability depends heavily on the door it operates. Even perfectly functioning openers struggle with unbalanced or damaged doors.
Spring Balance Testing
Disconnect the opener and manually lift the door halfway, then release it gently. A properly balanced door remains stationary when released at any point in its travel. Doors that fall indicate weak springs, while doors that rise suggest over-tensioned springs.
Spring imbalance forces openers to work harder, accelerating wear on drive components and motor assemblies. Addressing balance issues through professional spring adjustment restores efficiency and extends opener lifespan.
Track and Roller Condition
Damaged tracks or worn rollers create resistance that overloads opener motors. Inspect tracks for dents, bends, or alignment issues that could bind door movement. Rollers should turn freely without wobbling or grinding.
Replace worn rollers before they seize completely, as frozen rollers exponentially increase motor load. Steel rollers provide durability but create noise, while nylon rollers operate quietly but wear faster. Your choice depends on prioritizing longevity versus noise reduction.
Weather Seal Drag
Bottom weather seals create drag as doors close, particularly when seals become stiff in cold weather or sticky in warm conditions. Excessive drag triggers the opener's safety features, causing reversal before full closure.
Apply silicone spray to weather seals quarterly to maintain flexibility and reduce friction. Replace severely worn or damaged seals to prevent both air infiltration and operational problems.
When your garage door opener quit working, systematic troubleshooting identifies the cause and guides appropriate action. Many common failures respond to simple fixes that homeowners can safely perform, while complex issues benefit from professional diagnosis and repair. Regular maintenance prevents most unexpected failures, protecting your investment and ensuring reliable daily operation. If you're experiencing persistent opener problems or need expert assessment of your garage door system, NextLevel Garage Co. serves Bainbridge Island and throughout Kitsap County with professional repair, installation, and maintenance services backed by quality workmanship and clear communication.