
Picture this: you’re ready to leave for work, but your garage door refuses to open. A faulty garage door opener disrupts your schedule, compromises your home’s security, and can lead to unexpected expenses.
This guide will walk you step by step through opener repair, empowering you to tackle issues confidently and avoid costly service calls. We will cover opener types, common problems, essential tools, repair instructions, maintenance tips, and when to call a professional.
If you want to restore convenience and peace of mind, follow this clear, actionable opener repair guide designed for homeowners in 2026.
Understanding Garage Door Openers: Types and How They Work
Modern garage door systems are more complex and efficient than ever. To succeed at opener repair, homeowners must first understand the different types, core components, and new innovations shaping the market in 2026. Recognizing early signs of malfunction is also crucial for preventing expensive repairs.
Types of Garage Door Openers
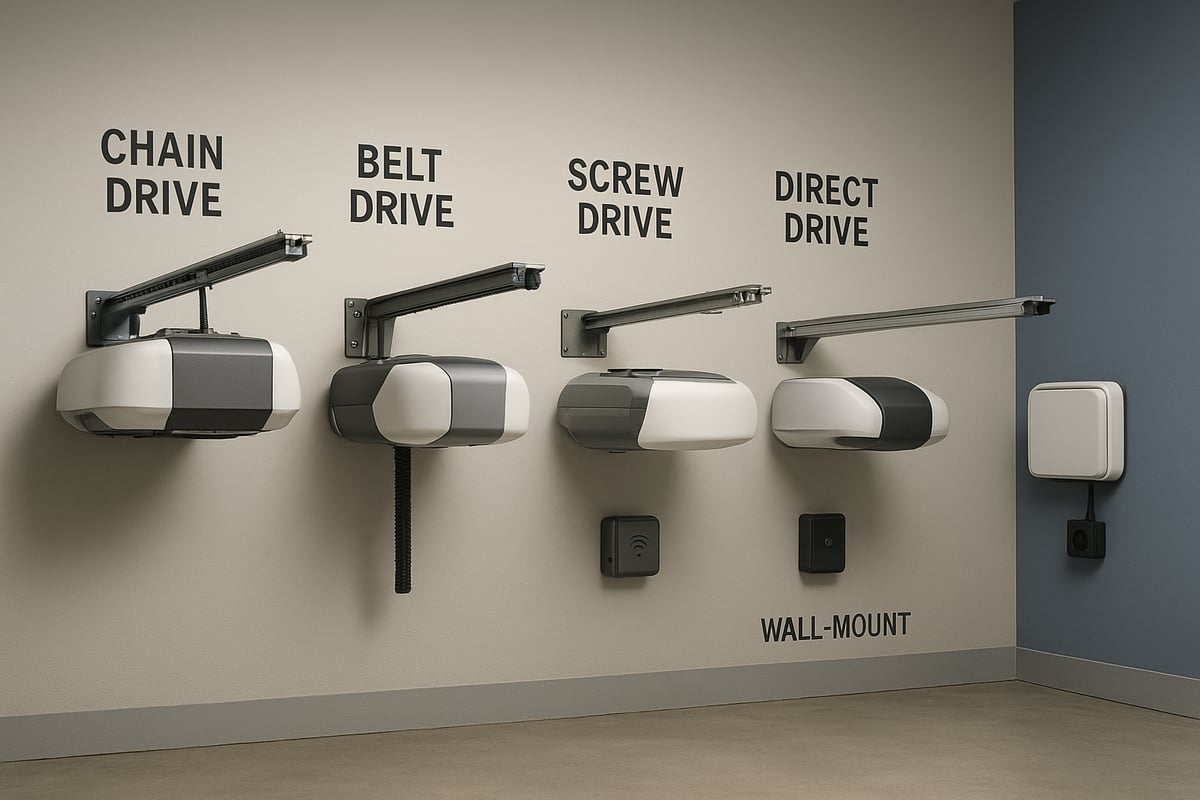
There are five main garage door opener types in 2026, each suited to different needs:
| Type | Mechanics | Pros | Cons | Common Use |
|---|---|---|---|---|
| Chain Drive | Chain + sprocket | Affordable, strong | Noisy | Standard garages |
| Belt Drive | Belt + pulleys | Quiet, smooth | Higher cost | Attached garages |
| Screw Drive | Threaded rod | Fewer parts | Sensitive to temp | Moderate climate |
| Direct Drive | Motor in trolley | Minimal noise | Premium pricing | Luxury homes |
| Wall-Mount | Mounted on wall | Space-saving | Specialized install | High ceilings |
According to recent data, smart openers with Wi-Fi now appear in 65% of new installs. For a deeper dive into opener types and their features, see Understanding garage door opener technologies.
Core Components and Operation
Every opener, regardless of type, shares essential components:
- Motor: Powers the system and moves the door.
- Drive Mechanism: Chain, belt, screw, or direct motor connection.
- Trolley: Connects drive mechanism to the door.
- Sensors: Located near the floor, they prevent accidental closure.
- Remote Control: Wireless access for convenience.
- Control Board: The electronic “brain” of the system.
During opener repair, you’ll often inspect how these parts interact. When you press the remote, the control board activates the motor, which turns the drive mechanism, moving the trolley and lifting or lowering the door. Sensors halt operation if they detect an obstruction, protecting people and property.
Smart Features and Modern Innovations
Garage door openers in 2026 offer advanced features for convenience and safety:
- Wi-Fi Connectivity: Control your garage from anywhere via smartphone apps.
- App Integration: Receive notifications for door activity and grant remote access for deliveries.
- Battery Backup: Ensures operation during power outages.
- Enhanced Security: Rolling codes and camera integration deter break-ins.
- Smart Home Compatibility: Seamless connection with Alexa, Google Home, and other systems.
These innovations impact opener repair by introducing both new troubleshooting steps and opportunities for remote diagnostics. App-based calibration and firmware updates are now routine tasks for many homeowners.
Signs of Opener Malfunction
Recognizing early symptoms is vital for effective opener repair and avoiding major failures. Common warning signs include:
- Unusual grinding or squeaking noises.
- Slow or inconsistent response times.
- Door failing to open, close, or reversing unexpectedly.
- Flashing or blinking error codes on the opener unit.
Industry data from 2024–2025 shows that 38% of service calls relate to sensor misalignment, making it the most frequent opener repair issue. Addressing these symptoms promptly saves time and reduces the risk of a complete system breakdown.
Diagnosing Common Opener Problems
A garage door that refuses to open or close can be a major headache. Diagnosing opener repair issues quickly helps prevent further damage and keeps your home secure. Let’s break down the most frequent causes, based on recent trends and real homeowner experiences.
Remote Control and Keypad Failures
Remote control and keypad issues are among the most common opener repair concerns. Dead batteries, worn-out remotes, or signal interference can all stop your opener from responding. After a power outage, the remote may need to be re-synced.
To diagnose, start by checking and replacing the batteries in your remote and keypad. Next, reprogram the remote following the manufacturer’s instructions. Make sure there are no obstructions or sources of interference nearby, such as wireless routers or LED lights. If the problem persists, consider replacing the remote or consulting a professional for opener repair.
Sensor and Safety System Issues
Safety sensors are critical for preventing accidents, but they are also a frequent source of opener repair service calls. If your garage door will not close or reverses unexpectedly, misaligned or dirty sensors are likely the culprit.
Look for blinking indicator lights on the sensor units. Gently clean the sensor lenses with a soft cloth and realign them until both lights are steady. Data from 2024 shows that sensor issues account for 40 percent of all opener repair appointments. Early attention to sensor alignment can save time and money.
Motor, Gear, and Drive Mechanism Problems
Mechanical failures can bring your garage door to a halt. Common opener repair scenarios include motor burnout, stripped gears, or broken chains and belts. Symptoms may include loud grinding noises or a motor that runs without moving the door.
Inspect the drive mechanism for visible damage or slack. Tighten or replace chains and belts as needed. If you hear grinding, check for stripped gears and replace them if necessary. Regular lubrication of moving parts, except for plastic gears, can prevent many opener repair headaches.
Power Supply and Circuit Board Errors
A sudden loss of power or electrical surges can render your opener inoperable. Tripped breakers, faulty wiring, or a damaged circuit board are frequent causes of opener repair needs. After a lightning storm, it is common for the opener to become unresponsive.
Begin by checking your home’s circuit breaker and ensuring the opener is plugged in. Inspect wiring for visible damage and look for burnt smells near the control board. If power is present but the opener remains unresponsive, it may be time to call for professional garage door opener repair to safely resolve complex electrical problems.
Essential Tools and Safety Precautions for DIY Opener Repair
Tackling opener repair yourself can be rewarding and cost-effective, but the right preparation is essential. Before starting, gather the necessary tools and follow strict safety guidelines to protect yourself and your home. This section covers everything you need to confidently and safely approach opener repair projects in 2026.
Must-Have Tools for Opener Repair
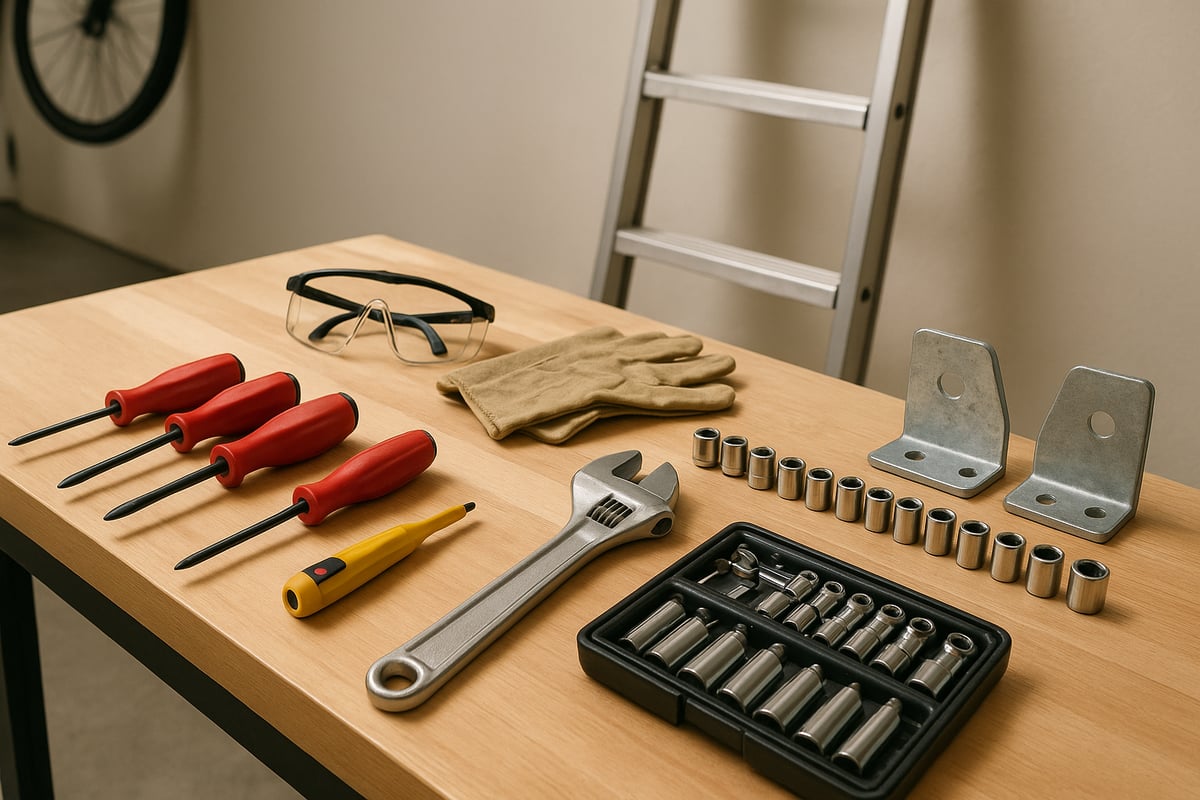
Every opener repair begins with assembling the right tools. Keep these items on hand:
- Phillips and flat-head screwdrivers for panel access and adjustments
- Adjustable wrench and socket set for hardware tightening
- Sturdy ladder to reach ceiling-mounted units
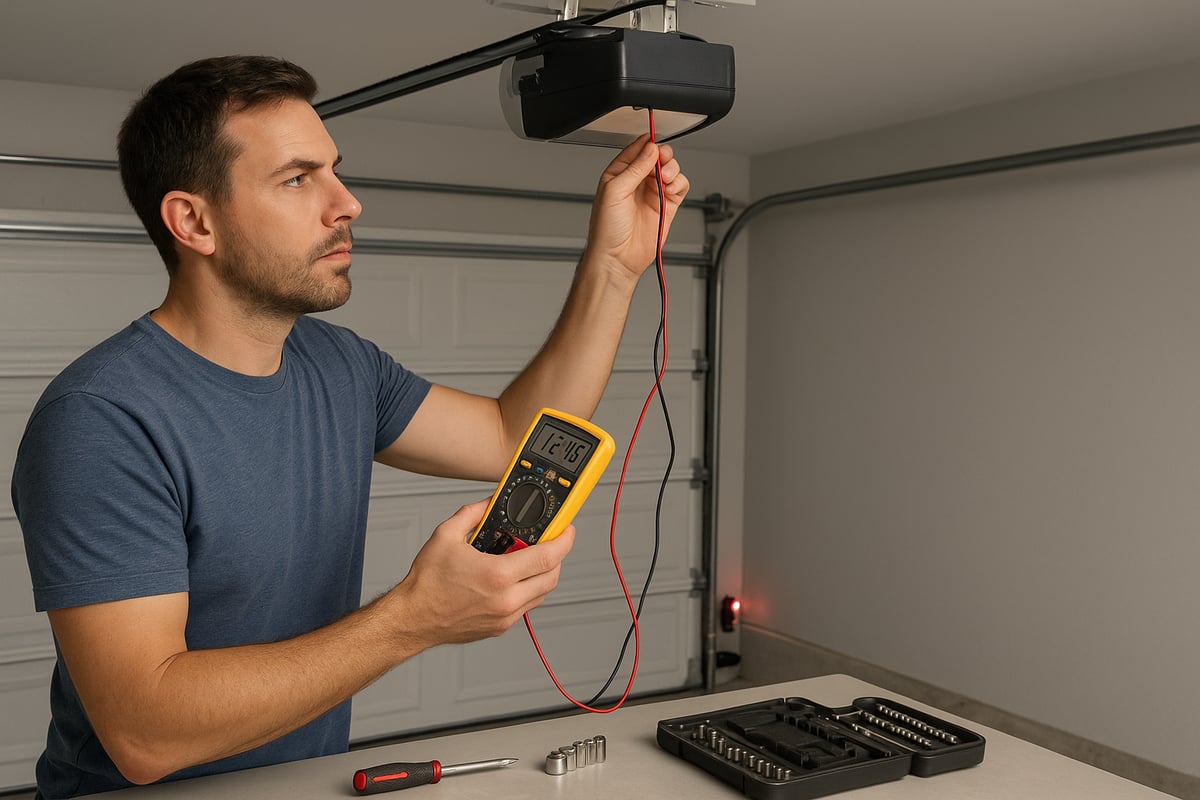
- Non-contact voltage tester for safe electrical checks
- Specialty tools, such as sensor alignment brackets and silicone-based lubricant
- Replacement parts like sensors or remotes
A voltage tester is crucial before touching any wiring. Using the correct tools not only makes opener repair smoother but also reduces the risk of accidental damage. Store all tools within easy reach before you begin.
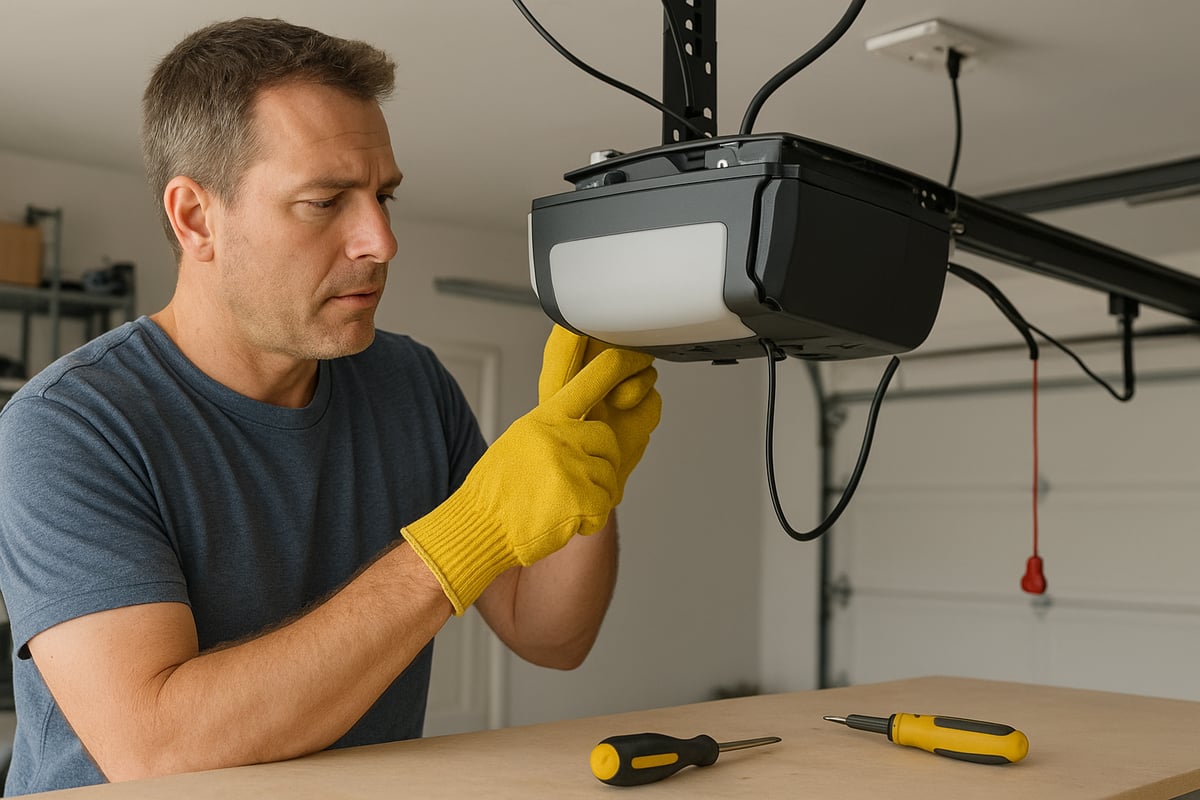
Safety First: Protecting Yourself and Your Home
Prioritizing safety during opener repair is non-negotiable. Always unplug the opener before working, and wear safety goggles and gloves to prevent injuries. Place your ladder on a stable, dry surface and never overreach. If possible, have someone nearby in case of emergency.
According to the CDC, over 1,200 emergency room visits each year result from garage door accidents. For more comprehensive safety tips and maintenance practices, review the Garage Door Safety and Maintenance Tips before starting any opener repair. Taking these precautions helps ensure a safe and successful DIY experience.
Preparing the Workspace
A clean, organized workspace is key for efficient opener repair. Start by clearing the area around your garage door so you have plenty of room to move. Ensure the space is well-lit to avoid missing small parts or making mistakes.
Keep tools and replacement parts within arm’s reach to minimize unnecessary movement. Make sure children and pets are kept away from the workspace during repairs. Good preparation can help you focus fully on the opener repair process and avoid avoidable accidents.
When Not to DIY: Recognizing High-Risk Repairs
Some opener repair tasks are too risky for DIY. If you notice a very heavy garage door, frayed cables, a burning electrical smell, or suspect torsion spring issues, stop immediately. Torsion springs store dangerous amounts of energy and can cause severe injury if handled improperly.
Major electrical faults or visible structural damage are also clear signs to call a professional. Attempting high-risk opener repair can void warranties and lead to costly mistakes. When in doubt, consult an expert for anything outside your comfort zone.
Step-By-Step Opener Repair Guide for Homeowners
A methodical approach can simplify opener repair, save money, and ensure continued garage security. Follow these steps to safely diagnose and resolve common issues before considering professional help.
Step 1: Troubleshooting and Initial Checks
Begin opener repair by confirming the basics. Is the opener plugged in and receiving power? Test the wall switch and ensure your remote works. Inspect the safety sensors near the floor; these should have steady indicator lights.
If the opener light blinks or the door only moves partially, suspect sensor misalignment or obstruction. Remove any debris from the sensor path. For doors that do not respond at all, reset the breaker or GFCI outlet supplying power to the opener.
A systematic approach can reveal simple problems early, preventing unnecessary opener repair expenses. Always start with these quick checks before moving to more complex solutions.
Step 2: Fixing Remote and Keypad Issues
Remote and keypad failures are frequent opener repair concerns. First, replace the batteries in all remotes and keypads. Weak or dead batteries are the most common cause of non-response.
If the device still fails, reprogram the remote according to your manufacturer’s instructions. Interference from nearby electronics can disrupt signals, so remove or relocate any possible sources.
Remotes may lose sync after a power outage. In these cases, resetting the remote or keypad often restores function. If problems persist, consider replacing the remote as part of your opener repair strategy.
Step 3: Adjusting and Cleaning Safety Sensors
Safety sensors are a critical part of opener repair. If your garage door reverses while closing or refuses to close, check the alignment of the sensors. The indicator lights on both should be steady—blinking lights signal misalignment.
Gently adjust the sensors until the lights remain solid. Clean the sensor lenses with a soft, dry cloth to remove dust or cobwebs. Avoid harsh chemicals which can damage sensor surfaces.
Blocked or dirty sensors are the leading cause of door reversal issues. Take care to clean and realign them regularly to prevent repeat opener repair needs.
Step 4: Addressing Mechanical and Drive Problems
Mechanical failures often require hands-on opener repair. Inspect the drive chain or belt for slack, wear, or breakage. Tighten loose components according to your owner's manual. If the chain or belt is damaged, replace it with a compatible part.
Lubricate all moving metal parts, such as hinges and rollers, with a recommended garage door lubricant. Avoid using grease on plastic gears.
A loud grinding noise typically indicates a stripped gear or worn drive. If unsure about proper adjustment, consult the Garage Door Opener Maintenance Guide for detailed mechanical troubleshooting steps.
Step 5: Motor and Circuit Board Repairs
When the motor hums but does not move the door, or if there is total silence, opener repair may involve motor or circuit board inspection. Unplug the opener before opening the housing. Look for burnt smells or visible damage on the circuit board.
If the opener is unresponsive yet power is present, the control board may need replacement. Some models have diagnostic LEDs that flash error codes—refer to your manual for interpretation.
Do not attempt complex electrical repairs unless you have experience. If you detect burnt wiring or severe board damage, professional opener repair is safest.
Step 6: Testing and Calibrating the Opener
After completing repairs, run a full open and close cycle to verify smooth operation. Observe for any hesitations, grinding, or unusual sounds.
Adjust the opener’s force and travel limits as described in your manufacturer’s instructions. Proper calibration ensures the door closes fully and opens without excessive strain.
A well-calibrated system prevents future opener repair needs and extends equipment life. Always finish with this test to confirm success.
Step 7: Final Safety and Function Checks
Safety is the final step in opener repair. Test the auto-reverse function by placing a small object in the door’s path. The door should reverse immediately upon contact.
Confirm that all controls—wall switch, remote, and keypad—operate correctly. If the auto-reverse feature fails, do not use the opener until resolved.
A thorough final check ensures your opener repair is both effective and secure, protecting your home and family.
Preventative Maintenance to Extend Opener Life
Regular preventative maintenance is the key to avoiding unexpected opener repair costs and ensuring your garage door system works reliably year after year. A few small, consistent efforts can dramatically extend the life of your equipment and keep your home secure.
Routine Maintenance Tasks
Staying ahead of opener repair starts with simple habits. Lubricate the chain, belt, and hinges every six months using a silicone-based product. Tighten all hardware, including bolts and brackets, to prevent vibrations and wear. Visually inspect for signs of rust or fraying.
- Lubricate moving parts twice a year
- Tighten loose bolts and screws
- Check for worn rollers or cables
According to industry experts, performing these year-round garage door maintenance tips can prevent up to 70% of mechanical failures. Make preventative care part of your regular schedule to minimize opener repair emergencies.
Sensor and Remote Maintenance
Sensors and remotes are vital to safe operation and opener repair success. Wipe sensor lenses with a soft, dry cloth monthly to remove dust and debris. Ensure both sensors are perfectly aligned; misalignment is a leading cause of malfunction.
- Clean sensors every month
- Check alignment and signal strength
- Replace remote and keypad batteries annually
Dirty or misaligned sensors often trigger unwanted door reversal. Staying proactive with sensor and remote care reduces the need for urgent opener repair and keeps your system running smoothly.
Smart Opener Software and Connectivity Updates
Modern garage door systems rely on software for security and functionality. Regularly check for firmware and app updates, as manufacturers roll out improvements for performance and safety. If your smart opener loses Wi-Fi after a power outage, follow the manufacturer’s instructions to reconnect and recalibrate.
- Update opener app and firmware when prompted
- Reconnect Wi-Fi after outages
- Calibrate sensors through the app if needed
For 2026 models, some updates may require app-based calibration. Staying up to date helps prevent software glitches that could lead to unnecessary opener repair calls.
Scheduling Professional Inspections
While DIY maintenance is essential, a certified technician should inspect your system annually. Professionals can spot hidden issues like frayed cables, spring fatigue, or subtle drive mechanism wear that might go unnoticed.
- Schedule an annual inspection
- Ask for a full safety and performance check
- Address minor repairs before they escalate
Preventative visits from a professional often cost less than emergency opener repair, saving you money and stress in the long run. Prioritize inspections to ensure your opener is safe, compliant, and ready for daily use.
When to Call a Professional: Cost, Warranty, and Safety Considerations
Making the right decision about opener repair often comes down to understanding costs, warranty coverage, and safety implications. While some minor issues are manageable as DIY projects, many situations call for expert intervention. Knowing when to involve a professional can save you money, protect your warranty, and safeguard your home.
Repair Costs and What to Expect
The price of opener repair in 2026 varies depending on the complexity of the issue, parts needed, and labor rates in your area. Most homeowners can expect to pay between $200 and $700 for typical repairs. For example, simple sensor realignment is usually on the lower end of the scale, while replacing a motor or circuit board costs more.
Factors that influence opener repair costs include the age and type of your opener, whether specialty parts are required, and the urgency of the repair. Emergency services or after-hours calls may also add to the total bill. For a broader industry perspective, you can review the latest Garage Door Repair Services Market Analysis to see trends affecting pricing and demand.
Warranty and Insurance Factors
Before starting any opener repair, check if your unit is still under manufacturer or installer warranty. Many warranties explicitly state that DIY repairs or modifications can void coverage, leaving you responsible for future costs. Always review the warranty terms before attempting repairs yourself.
Insurance considerations are equally important. Some homeowner policies may cover opener repair after events like power surges or storms, but only if work is performed by a licensed professional. Always document the issue and keep records of any repairs or service calls. Making the wrong move could mean missing out on valuable coverage.
Safety Risks and Legal Considerations
Opener repair can pose significant safety risks, especially if the job involves high-tension springs or electrical components. Attempting repairs without the right skills or tools can result in injury or property damage. For tasks like spring replacement or electrical troubleshooting, calling a professional is the safest choice.
Improper opener repair may also violate local building codes or insurance requirements. Mistakes can lead to denied claims or even legal liability in the event of an accident. For a comprehensive overview of safety protocols, consult the Automatic Garage Door Opener Safety & Maintenance Guide before tackling any complex repairs on your own.
Choosing a Qualified Repair Service
Selecting the right professional for your opener repair is essential for peace of mind and long-term reliability. Look for a company that is licensed, insured, and has strong customer reviews. Ask for transparent estimates and clear communication about the scope of work.
In urgent situations or when repairs go beyond basic troubleshooting, consider using a dedicated emergency garage door repair service to ensure your home’s safety and security. Most customers prefer professional opener repair because it provides expertise and guarantees that DIY fixes often lack. Same-day service is often available for critical issues.
Frequently Asked Questions About Opener Repair
Having questions about opener repair is common, especially when your garage door stops working at the worst possible time. Here are the answers to the most frequent concerns homeowners face, with practical solutions you can trust.
Why won’t my garage door opener close the door?
If your garage door refuses to close, opener repair should start with a few basic checks. The most common culprit is misaligned safety sensors. These sensors, located near the floor on both sides of the door, prevent accidents by stopping the door if something is in the way.
Other possible causes include:
- Obstructions in the door’s path
- Dead batteries in your remote control
- Faulty wiring or power interruptions
A blinking light or beeping sound from the opener usually signals a sensor issue. Try cleaning the sensor lenses and making sure they face each other directly. If the problem continues, opener repair may require professional help.
How do I reset my garage door opener after a power outage?
After a power outage, opener repair often involves resetting the system to restore normal function. Start by unplugging the opener from the outlet, wait three minutes, and plug it back in. This simple step can clear minor electrical glitches.
If the door still will not respond, you may need to reprogram your remotes. Most openers have a “learn” or “reset” button on the control panel. Hold this button until the indicator light flashes, then press your remote button to sync.
Power surges can sometimes damage the circuit board, requiring more advanced opener repair. If resetting does not work, consider consulting a technician.
How can I prevent opener issues in cold weather?
Cold temperatures can make opener repair more frequent due to increased strain on moving parts. To minimize problems, use a cold-resistant lubricant on chains and hinges before winter arrives. This helps the door move smoothly despite freezing conditions.
Other preventative tips:
- Schedule a maintenance check in the fall
- Keep the opener motor area clean and dry
- Test the door’s balance and safety reversal system
According to recent data, opener failures rise by 22% during cold weather. Regular upkeep reduces the need for emergency opener repair and keeps your system reliable all season.
What are the signs I need a new opener instead of a repair?
Sometimes, opener repair is not enough to restore safe operation. Signs that it is time for a replacement include:
- Frequent breakdowns or repeated service calls
- Loud or unusual noises that persist after repairs
- Missing modern safety features like auto-reverse or rolling code security
- Incompatibility with smart home devices
If your opener is over 15 years old, it may lack essential safety technology and become costly to maintain. Weigh the cost of ongoing opener repair against the benefits of a new, more efficient model to make the best choice for your home.
If you’ve made it this far, you know just how essential a reliable garage door opener is for your home’s security and daily routine. While this guide gives you the know how to handle many repairs on your own, sometimes the safest and most cost effective solution is to bring in an expert—especially when you’re facing complex electrical issues or high risk spring repairs. At NextLevel Garage Co., we’re committed to keeping Bainbridge Island and Kitsap County homes running smoothly with honest advice and skilled workmanship. If you’d like a clear assessment or just some friendly guidance, Call now for a free estimate!
Article written using RankPill.