
Discovering that your garage cable broke can turn an ordinary morning into a frustrating ordeal. This critical component of your garage door system works under tremendous tension to lift and lower hundreds of pounds of door panels safely and smoothly. When a cable fails, the door becomes inoperable and potentially dangerous. For homeowners across Kitsap County and Bainbridge Island, understanding what happens when cables break, recognizing warning signs early, and knowing the proper response can save time, money, and prevent injury. This comprehensive guide walks you through everything you need to know about broken garage door cables, from immediate safety steps to professional repair considerations.
Understanding Your Garage Door Cable System
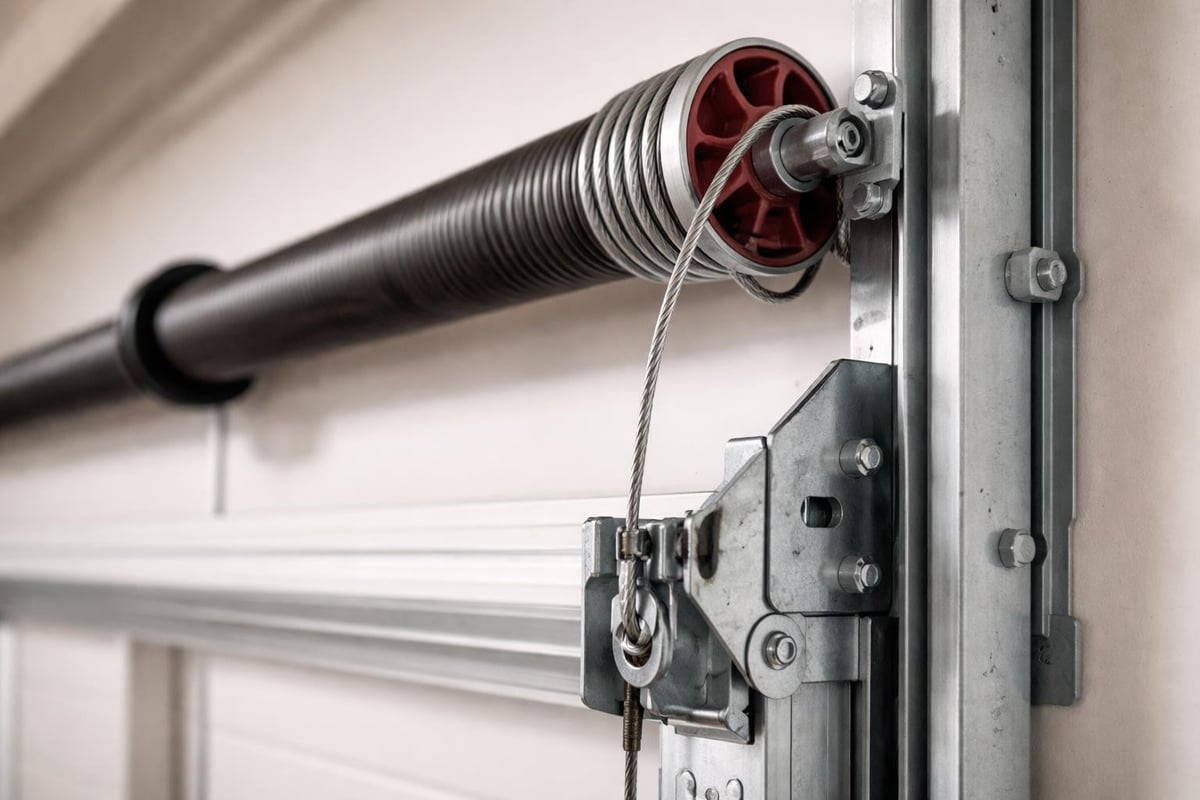
Garage door cables are high-strength steel components that work in tandem with springs to counterbalance the weight of your door. These cables run from the bottom corners of the door, through pulleys, and connect to the spring system mounted above the door opening.
The two primary cable types serve distinct functions. Lift cables attach to the bottom bracket of the door and wind around the cable drum as the door opens, providing the mechanical advantage needed to raise the panels. Retention cables run through the center of extension springs, preventing broken spring pieces from causing property damage or injury if the spring fails.
When a garage cable broke, the door loses its balanced lifting mechanism. This creates an immediate safety hazard because one side may drop suddenly while the other remains partially supported. The average residential garage door weighs between 150 and 300 pounds, meaning a broken cable can result in serious property damage or personal injury if the door falls unexpectedly.
Common Cable Configurations
Different garage door systems use varying cable arrangements based on the spring type installed:
- Torsion spring systems utilize cables that wind around drums mounted on a shaft above the door
- Extension spring systems employ cables that run horizontally along the tracks with safety retention cables through the spring center
- Commercial and heavy-duty systems may feature multiple cables per side for additional strength and redundancy
| Spring Type | Cable Configuration | Typical Lifespan | Tension Level |
|---|---|---|---|
| Torsion | Drum-wound lift cables | 7-9 years | Very High |
| Extension | Pulley-routed with safety cables | 5-7 years | High |
| Commercial Torsion | Multiple cables per drum | 10-15 years | Extreme |
Warning Signs Before Your Garage Cable Broke
Most cable failures don't happen without warning. Recognizing early indicators allows you to schedule repairs before experiencing a complete breakdown. Regular visual inspections as part of your maintenance routine reveal problems before they escalate.
Frayed wires represent the most visible warning sign. Cables consist of multiple wire strands twisted together, and when individual strands begin breaking, the cable's surface appears fuzzy or frayed. According to industry safety guidance on frayed cables, even minor fraying requires immediate professional attention.
Unusual sounds during operation often indicate cable stress. Listen for grinding, scraping, or popping noises as the door moves. These sounds suggest the cable is rubbing against components incorrectly or individual strands are snapping under load.
Physical Inspection Points
Monthly visual checks should include these specific areas:
- Cable connection points at the bottom door brackets
- Cable wrapping around the drums (visible gaps or overlapping indicate problems)
- Cable condition through the pulley system
- Any rust, corrosion, or discoloration on cable surfaces
- Proper cable tension when the door is closed (cables should be taut but not overly tight)
Door performance changes signal developing cable issues. If your door opens unevenly, with one side rising faster than the other, cable wear or stretching may be responsible. A door that struggles to open fully or closes too quickly also points to cable and spring balance problems.
Immediate Steps When Your Garage Cable Broke
Safety becomes the absolute priority the moment you realize your garage cable broke. Taking the right immediate actions prevents injuries and additional property damage.
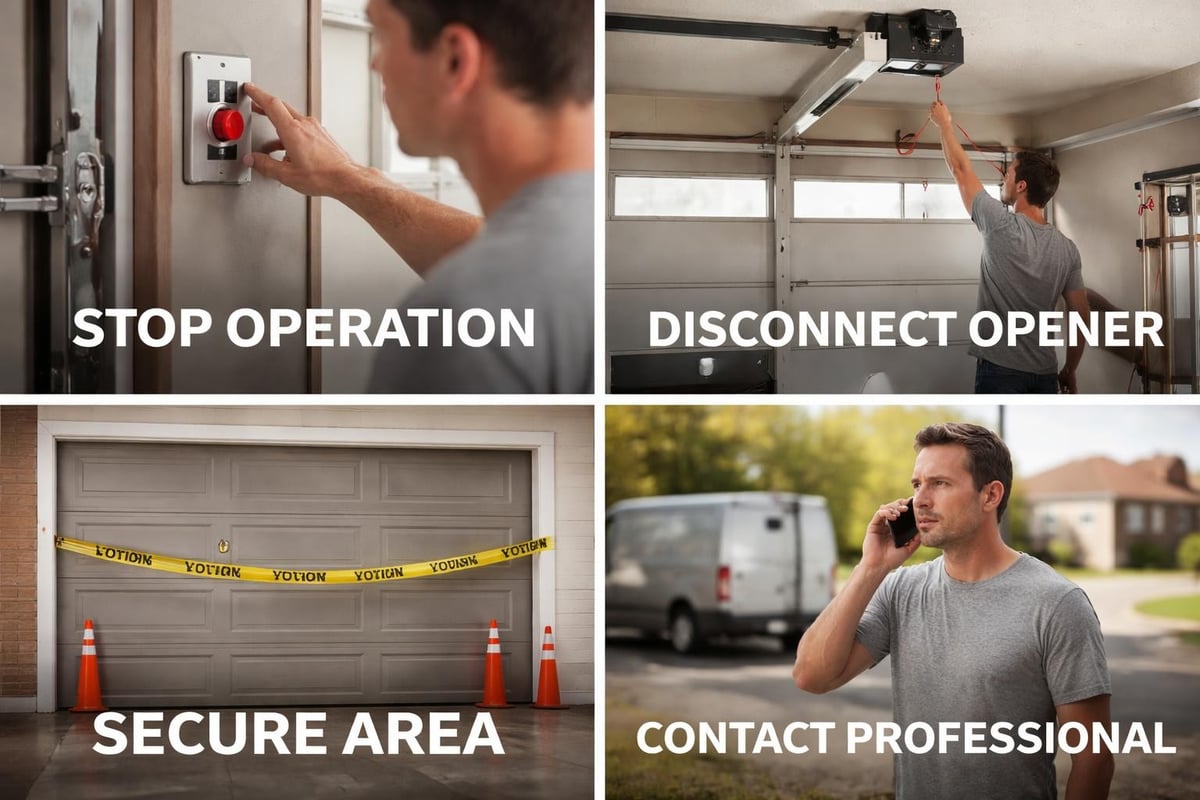
Stop all door operation immediately. Do not attempt to open or close the door manually or with the opener. The door's weight distribution is now compromised, and movement could cause sudden dropping or jamming.
Disconnect the automatic opener. Pull the manual release handle to disengage the opener trolley from the door. This prevents the opener motor from attempting to operate the damaged door, which could burn out the motor or cause the door to fall. If you're unfamiliar with manual garage door operation, the release handle typically hangs from the opener rail with a red cord attached.
Securing the Area
Clear the immediate area beneath and around the garage door:
- Move vehicles out of the garage if possible
- Remove tools, equipment, or storage items from near the door
- Keep children and pets away from the garage
- Place warning signs or barriers if the garage is in a commercial setting
Contact a professional garage door service immediately. As emphasized in professional safety guidance, garage door cable repair is not a DIY project due to the extreme tension involved. Technicians have specialized tools and training to safely manage the forces involved.
Why Garage Cables Break: Root Causes
Understanding why your garage cable broke helps prevent future failures. Multiple factors contribute to cable deterioration and sudden breakage, often working in combination to weaken these critical components.
Normal wear and tear remains the most common culprit. Every time your door cycles open and closed, cables flex, bend, and carry load. Most residential garage doors cycle between 1,000 and 1,500 times annually. After several years, this repetitive stress causes metal fatigue in the wire strands.
Environmental conditions accelerate cable degradation. Homes in coastal areas like Bainbridge Island face additional challenges from salt air, which promotes corrosion. High humidity, temperature extremes, and exposure to chemicals or cleaning products stored in garages also compromise cable integrity.
Mechanical and Installation Factors
Poor initial installation creates premature cable failure:
- Incorrect cable length causes excessive tension or slack
- Wrong cable type for the door weight leads to overloading
- Improper drum winding creates uneven stress distribution
- Misaligned pulleys cause cables to rub and fray
Spring failure impacts often trigger cable problems. When torsion springs break, the sudden release of tension can snap cables or cause them to slip off drums. Extension spring failures can similarly damage or sever cables through rapid, uncontrolled movement.
Lack of maintenance significantly shortens cable life. Cables require periodic lubrication to reduce friction and prevent rust. Without proper care, cables dry out, corrode, and weaken much faster than their designed lifespan. Resources on preventing cable wear through maintenance outline essential care practices.
The Dangers of DIY Cable Repair
When your garage cable broke, the temptation to attempt a do-it-yourself repair can be strong, especially given the inconvenience of a non-functioning garage door. However, garage door cable repair ranks among the most dangerous home maintenance tasks.
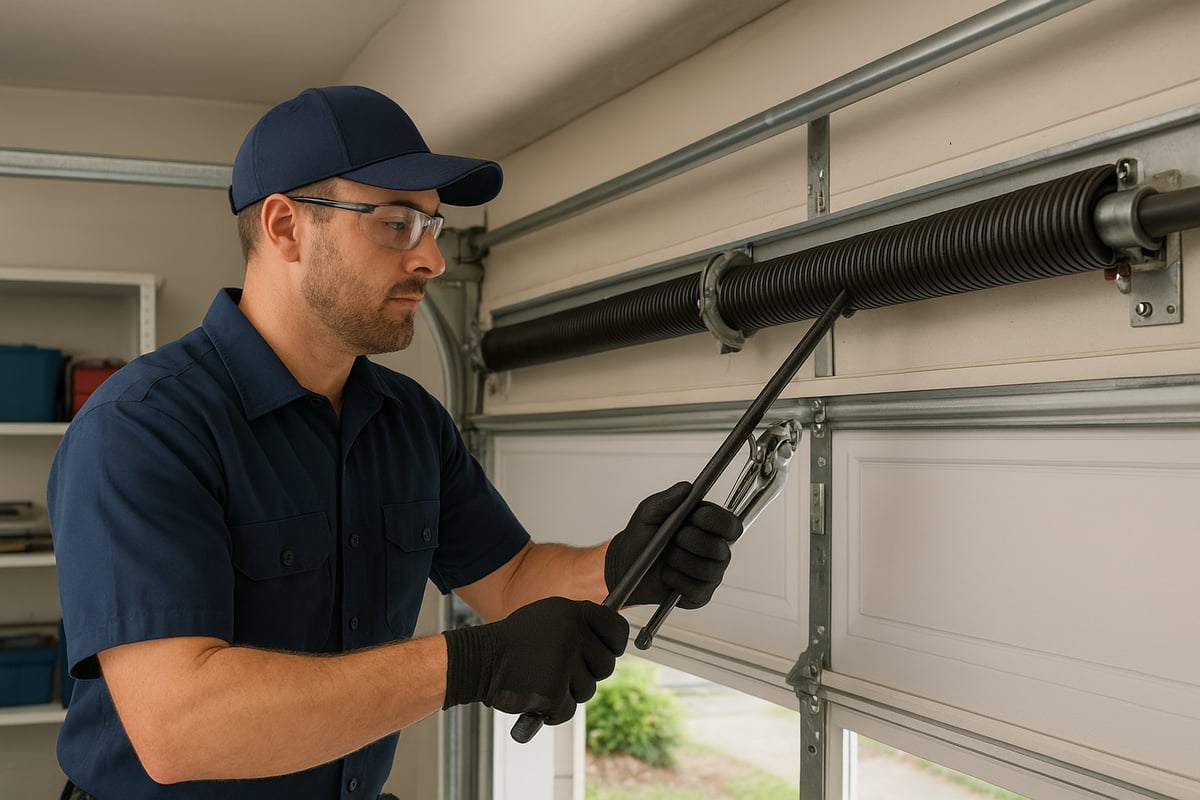
Extreme tension creates the primary hazard. Torsion springs store enough energy to lift a 200-pound door effortlessly. This same energy can cause severe injury if released unexpectedly during cable work. The documented dangers of DIY cable repairs include broken bones, lacerations, and even fatalities from spring-related injuries.
Specialized tools are required for safe cable replacement. Professional technicians use winding bars, cable tensioning tools, and secure door-holding equipment that homeowners typically don't possess. Attempting repairs without proper equipment increases injury risk exponentially.
Professional Equipment and Expertise
Licensed garage door technicians bring critical advantages:
| Aspect | Professional Approach | DIY Attempt |
|---|---|---|
| Safety Equipment | Winding bars, safety glasses, gloves, door clamps | Improvised tools, inadequate protection |
| Spring Knowledge | Precise tension calculations, proper winding counts | Guesswork, incorrect tension |
| Cable Selection | Exact specifications for door weight and size | Generic or incorrect cable type |
| Warranty Protection | Service guarantees, insured work | No recourse if problems occur |
| Time Investment | 1-2 hours typical | 4-8 hours plus research time |
Door balance requires precision that only comes with experience and proper tools. After installing new cables, technicians adjust spring tension to ensure the door rises smoothly and stays in place when partially opened. Incorrect balance causes premature wear on the opener motor and creates operational safety issues.
For reliable cable replacement and overall door maintenance, homeowners throughout Kitsap County can access professional garage door services with the expertise to handle high-tension components safely.
Professional Cable Replacement Process
Understanding what happens during professional cable replacement helps you appreciate the complexity involved when your garage cable broke and requires repair. Licensed technicians follow systematic procedures to ensure safe, lasting results.
The initial assessment identifies all contributing factors. Technicians inspect not only the broken cable but also springs, drums, brackets, bearings, and door alignment. Often, a cable failure indicates other worn components that should be replaced simultaneously to prevent cascading failures.
Safety preparation establishes secure working conditions. Technicians clamp or brace the door in place, release spring tension using proper winding techniques, and ensure no unexpected movement can occur during the repair. This controlled environment allows safe access to all cable connection points.
Step-by-Step Cable Installation
Professional cable replacement follows this sequence:
- Tension release: Springs are carefully unwound using winding bars to remove all stored energy
- Old cable removal: Damaged cables are disconnected from bottom brackets and unwound from drums
- Inspection: All related components receive thorough examination for wear or damage
- New cable installation: Properly sized cables are threaded through pulleys and attached to bottom brackets
- Drum winding: Cables are wound onto drums with precise spacing and alignment
- Tension restoration: Springs are rewound to manufacturer specifications for the door weight
- Balance testing: Door is manually tested at multiple positions to verify proper balance
- Operational testing: Full open-close cycles confirm smooth, safe operation
When cable damage coincides with spring wear, many professionals recommend addressing both simultaneously. Garage Door Spring Repair services restore proper balance and lifting force while new cables are being installed, maximizing the lifespan of all components.
Component matching ensures optimal performance. Professional technicians select cables with the correct diameter, length, and strength rating for your specific door model and weight. Using generic or incorrect cables compromises safety and longevity, regardless of installation quality.
Preventing Future Cable Failures
After experiencing the inconvenience and expense of a broken cable, prevention becomes a priority. Implementing regular maintenance practices significantly extends cable life and reduces the likelihood that your garage cable broke scenario repeats itself.
Monthly visual inspections catch problems early. Examine cables for fraying, rust, or unusual wear patterns. Look for proper cable seating in drum grooves and smooth routing through pulleys. Check that cables remain taut when the door is closed but don't show excessive tension.
Proper lubrication reduces friction and prevents corrosion. Apply garage door-specific lubricant to cables, springs, bearings, and hinges every three months. Avoid petroleum-based products that attract dust and dirt. Simple maintenance steps for preventing cable breakage include this essential lubrication routine.
Maintenance Schedule for Cable Longevity
| Frequency | Maintenance Task | Purpose |
|---|---|---|
| Monthly | Visual cable inspection | Identify fraying or damage early |
| Quarterly | Lubricate cables and moving parts | Reduce friction and corrosion |
| Bi-annually | Professional safety inspection | Comprehensive system evaluation |
| Annually | Spring tension verification | Ensure proper door balance |
| As needed | Weather seal replacement | Prevent moisture damage |
Balance testing should occur twice yearly. With the door halfway open, release it gently. A properly balanced door stays in place or moves minimally. A door that falls rapidly or rises indicates spring and cable tension issues requiring professional adjustment.
Address minor issues promptly. Small problems like loose brackets, worn rollers, or slight door misalignment create uneven cable stress that accelerates wear. Regular garage door inspections identify these concerns before they cause cable failure.
Environmental protection extends cable life in challenging climates. Consider applying rust-preventive coatings in high-humidity or coastal environments. Ensure proper garage ventilation to reduce moisture accumulation that promotes corrosion.
Choosing Between Repair and Full Door Replacement
When your garage cable broke, particularly on an older door, the question arises whether to repair the cable or invest in complete door replacement. Several factors inform this decision beyond the immediate cable issue.
Door age provides the primary consideration. Garage doors typically last 15 to 30 years depending on material, usage, and maintenance. If your door approaches or exceeds 15 years old, multiple components likely need attention soon. Investing in cable repair may be followed quickly by spring replacement, panel damage repair, and other costs that accumulate beyond replacement expense.
Calculate total system condition. When cables break on doors with significant rust, panel damage, or outdated safety features, replacement often proves more cost-effective. Modern doors offer improved insulation, quieter operation, and enhanced security features that older repaired doors cannot match.
Cost Comparison Factors
Consider these elements when evaluating repair versus replacement:
- Current cable repair costs
- Likely additional repairs needed within two years
- Energy efficiency improvements from insulated replacement doors
- Home value impact of updated garage door
- Warranty coverage on new doors versus repaired components
- Opener compatibility (older doors may not work well with modern openers)
Safety improvements available with new doors include pinch-resistant panel joints, tamper-resistant brackets, and integrated emergency release mechanisms. These features weren't standard on doors manufactured before 2010, making replacement an opportunity to enhance household safety.
Aesthetic updates may justify replacement costs. If you're planning exterior home improvements or considering selling your property, a new garage door delivers substantial curb appeal impact. For homeowners exploring comprehensive upgrades, guidance on upgrading your garage helps coordinate door replacement with other projects.
Understanding Replacement Cable Options
Not all replacement cables deliver equal performance or longevity. When your garage cable broke and requires replacement, understanding cable specifications helps you work effectively with repair professionals and ensures quality results.
Cable diameter must match your door's weight and spring system. Residential garage doors typically use cables ranging from 1/8 inch to 3/16 inch diameter. Lighter doors function properly with thinner cables, while heavier doors or commercial applications require thicker, stronger cables. Installing undersized cables leads to rapid failure and safety risks.
Material composition affects durability and corrosion resistance. Standard galvanized steel cables offer good strength and moderate corrosion protection suitable for most environments. Stainless steel cables cost more but provide superior corrosion resistance for coastal areas or high-humidity environments like those found around Puget Sound.
Cable Specification Chart
| Door Weight | Cable Diameter | Typical Material | Expected Lifespan |
|---|---|---|---|
| Up to 150 lbs | 1/8 inch | Galvanized steel | 7-10 years |
| 150-250 lbs | 5/32 inch | Galvanized steel | 8-12 years |
| 250-400 lbs | 3/16 inch | Galvanized or stainless | 10-15 years |
| Over 400 lbs | 7/32 inch or larger | Commercial-grade steel | 12-18 years |
Cable length requires precise calculation based on door height, track configuration, and drum size. Even slight length errors cause improper tension, uneven door operation, and premature component wear. Professional technicians measure existing cables and verify specifications against manufacturer documentation rather than relying on generic sizing.
Strand count impacts cable flexibility and strength distribution. Most residential cables feature 7×19 construction (seven bundles of 19 wires each), providing an effective balance of flexibility and strength. Commercial applications may use different strand configurations optimized for specific load and cycle requirements.
Emergency Access When Your Garage Cable Broke
A broken cable often traps vehicles inside the garage or prevents access to items stored there. Knowing safe emergency access methods provides temporary solutions while awaiting professional repair.
Manual opener disengagement allows careful manual operation in some situations. After pulling the emergency release cord, two people can manually lift the door if one cable remains intact and the door isn't severely unbalanced. Never attempt this alone, and stop immediately if the door feels unstable or extremely heavy.
The safe manual operation process requires caution:
- Clear all items from beneath the door's path
- Ensure at least two strong adults are present
- Pull the emergency release handle to disconnect the opener
- Grasp the door firmly at multiple points across its width
- Lift slowly and evenly, watching for any tilting or binding
- If the door becomes difficult or unstable, lower it immediately and stop
For detailed guidance on manually opening garage doors when power or mechanical failures occur, specific techniques help minimize risk during emergency access situations.
Alternative access points provide safer options when available. Many homes have passage doors connecting the garage to the house interior or exterior service doors providing garage access. Using these alternatives eliminates the need to operate a damaged overhead door.
Temporary security measures become important if your broken cable leaves the door inoperable in an open position. Place additional locks on passage doors, park vehicles elsewhere if possible, and consider temporary barriers to secure the opening until repairs are completed.
Long-Term Door Health After Cable Replacement
Successfully repairing your broken cable represents an opportunity to implement practices that protect your entire garage door system. Taking a comprehensive approach to door health prevents future emergencies and maximizes your investment in repairs.
Post-repair break-in period allows new cables to settle into their operational pattern. During the first week after cable replacement, operate the door several times daily to ensure cables seat properly on drums and through pulleys. Listen for unusual sounds and watch for any irregular movement patterns that might indicate adjustment needs.
Document your repair creates a maintenance history. Record the date of cable replacement, service provider information, and any related component work performed. This documentation helps track component ages, warranty periods, and maintenance intervals for future reference.
Comprehensive System Monitoring
Expand your inspection routine beyond cables:
- Rollers: Check for wear, cracks, or wobbling during operation
- Hinges: Look for rust, looseness, or unusual wear patterns
- Tracks: Verify alignment and check for dents or obstructions
- Weather seals: Ensure proper sealing to prevent moisture intrusion
- Opener: Test auto-reverse safety features and listen for motor strain
Professional annual inspections complement homeowner maintenance. Technicians identify subtle problems like bearing wear, track misalignment, or developing spring issues that escape casual observation but accelerate component deterioration.
Upgrade considerations may arise during cable replacement. If your door uses outdated extension springs, consider converting to torsion springs during cable repair for improved performance and safety. Similarly, if your opener struggles with the door's weight, cable replacement timing coincides well with opener upgrades to modern, more capable systems.
When your garage cable broke, swift action combined with professional repair restores safe, reliable operation while preventing further damage. Regular inspections, proper maintenance, and attention to warning signs help you avoid future cable failures and extend your entire garage door system's lifespan. For homeowners and businesses throughout Kitsap County facing garage door cable issues or seeking preventive maintenance services, NextLevel Garage Co. delivers expert repairs with the specialized knowledge and equipment required for safe, lasting results. Contact our team to schedule an inspection or emergency repair service today.